NavTree: Difference between revisions
No edit summary |
|||
| (8 intermediate revisions by the same user not shown) | |||
| Line 8: | Line 8: | ||
== Icon Library == | == Icon Library == | ||
<gallery> | |||
File:Phenom-navtree-cdm.png|Conceptual Data Model | |||
File:Phenom-navtree-ldm.png|Logical Data Model | |||
File:Phenom-navtree-pdm.png|Platform Data Model | |||
File:Phenom-navtree-uop-or-service.png|Service Model Icon | |||
File:|Integration Model Icon | |||
File:|Deployment Model Icon | |||
File:Phenom-navtree-default.png|border|Default icon when there is no specialized icon for the element in the tree | |||
</gallery> | |||
== Nav Tree Actions == | |||
From the Nav Tree, the user can: | |||
* Move an element to a different package | |||
* Sort alphabetically | |||
* Search for elements | |||
* Filter by tags or by node type | |||
* Add tags to an element | |||
* Open the details of an element to view/edit it by double-clicking the element | |||
* Find the element open in the details page (target icon) | |||
=== Moving an element === | |||
To move an element in the Nav Tree, the user can drag and drop it to the desired destination. | |||
[[ | An element can only be moved to a package typed with the same modeling level (i.e, Observables, Entities, and Associations can only be moved to Conceptual packages; Measurements, Measurement Systems, Coordinate Systems...; can only be moved to Logical packages...). When dragging a selected element over a possible destination package/element, the destination will be displayed next to the cursor for clarity along with an icon indicating if the move is valid (a green checkmark for valid moves and a red X for invalid ones). For more details on Packages and the elements they can contain, refer to the [[Package]] page. | ||
[[File:Phenom- | [[File:Phenom-data model-details package move bad.png|border]] [[File:Phenom-data model-details package move good.png|border]] | ||
== Nav Tree | === Searching === | ||
To search for elements by name, enter a search term on the Search Bar, and click the magnifying glass or enter to initiate the search. Elements matching the search query will be highlighted and the number of results will be displayed | |||
* | |||
* | [[File:Phenom-navigation-navtree search.png|border]] | ||
To cycle through the results, the user can click on the magnifying glass or press enter. | |||
=== Filtering === | |||
The Nav Tree filter allows finer control over what content should be displayed on the screen. | |||
To filter the Nav Tree, click the funnel icon and select the desired type of filter: | |||
* By Tag | |||
* By Type | |||
To filter by tag, select the tags to include and to exclude from the dropdown lists. The toggle at the top of the panel defines the query operator: | |||
* 'AND': all tags will be appended using the AND operator | |||
* 'OR': all tags will be appended using the OR operator | |||
For example, if a user includes the tags inc1 and inc2, and excluded exc1 and exc2. Then the filter queries will be: | |||
* 'AND' operator selected: inc1 AND inc2 AND NOT exc1 AND NOT exc2 | |||
* 'OR' operator selected: inc1 OR inc2 OR NOT exc1 OR NOT exc2 | |||
[[File:Phenom-navigation-navtree filter tag.png|border]] | |||
To filter by type, select the type that should be displayed in the Nav Tree. If no type is selected, all are shown; if one or more types are selected, only nodes of those types will be displayed. | |||
[[File:Phenom-navigation-navtree filter type.png|border]] | |||
=== Tagging === | |||
The user can add tags to an element from its details page (see the [[Data Model Details]] or [[Integration Model Details]] pages) or by right-clicking one or several elements in the Nav Tree. Either way, after clicking the "Edit tags" button, a dialog will show up. | |||
[[File:Phenom-navigation-navtree tags edit.png|border]] | |||
To add an existing tag, start typing it in the "Add New Tags" fields and select from the dropdown list. To add a new tag, type it in the field and press Enter. Once all the tags have been added, click Save. | |||
[[File:Phenom-navigation-navtree tags add.png|border]] [[File:Phenom-navigation-navtree tags added.png|border]] | |||
If multiple elements are being edited, the selected tags will be applied to all. | |||
[[File:Phenom-navigation-navtree tags multiple nodes.png|border]] | |||
Latest revision as of 16:50, 25 October 2022
The Navigation Tree (NavTree for short), is the primary user interface for organizing and browsing model content.
Each Package (folder) is limited in what type of content it is allowed to contain. Conceptual packages are allowed to contain conceptual elements, Logical packages are allowed to contain logical elements, Platform packages are allowed to contain platform elements, Service packages are allowed to contain UoPs, Integration packages are allowed to contain integration elements, and Deployment packages are allowed to contain deployment elements.
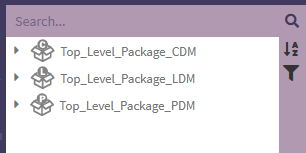
Each type of data element has its own distinct icon. All icons will be shown in the following section.
Icon Library
-
Conceptual Data Model
-
Logical Data Model
-
Platform Data Model
-
Service Model Icon
-
Default icon when there is no specialized icon for the element in the tree
Nav Tree Actions
From the Nav Tree, the user can:
- Move an element to a different package
- Sort alphabetically
- Search for elements
- Filter by tags or by node type
- Add tags to an element
- Open the details of an element to view/edit it by double-clicking the element
- Find the element open in the details page (target icon)
Moving an element
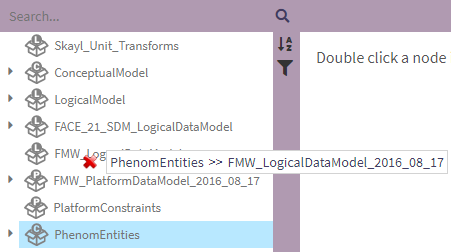
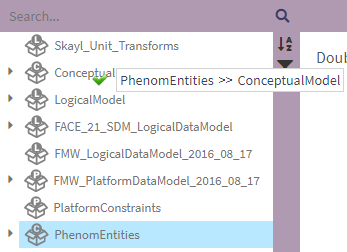
To move an element in the Nav Tree, the user can drag and drop it to the desired destination.
An element can only be moved to a package typed with the same modeling level (i.e, Observables, Entities, and Associations can only be moved to Conceptual packages; Measurements, Measurement Systems, Coordinate Systems...; can only be moved to Logical packages...). When dragging a selected element over a possible destination package/element, the destination will be displayed next to the cursor for clarity along with an icon indicating if the move is valid (a green checkmark for valid moves and a red X for invalid ones). For more details on Packages and the elements they can contain, refer to the Package page.
Searching
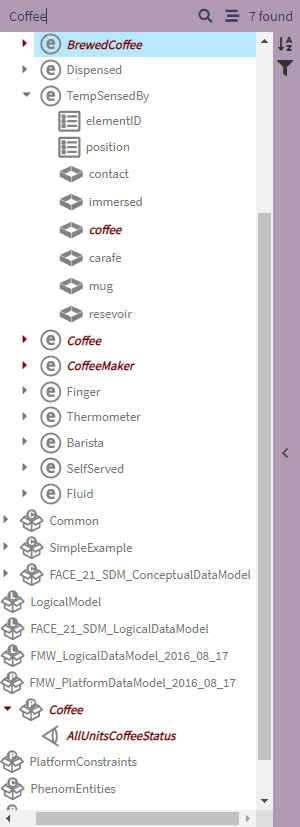
To search for elements by name, enter a search term on the Search Bar, and click the magnifying glass or enter to initiate the search. Elements matching the search query will be highlighted and the number of results will be displayed
To cycle through the results, the user can click on the magnifying glass or press enter.
Filtering
The Nav Tree filter allows finer control over what content should be displayed on the screen. To filter the Nav Tree, click the funnel icon and select the desired type of filter:
- By Tag
- By Type
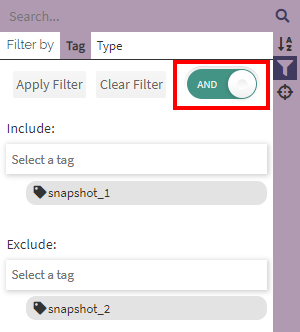
To filter by tag, select the tags to include and to exclude from the dropdown lists. The toggle at the top of the panel defines the query operator:
- 'AND': all tags will be appended using the AND operator
- 'OR': all tags will be appended using the OR operator
For example, if a user includes the tags inc1 and inc2, and excluded exc1 and exc2. Then the filter queries will be:
- 'AND' operator selected: inc1 AND inc2 AND NOT exc1 AND NOT exc2
- 'OR' operator selected: inc1 OR inc2 OR NOT exc1 OR NOT exc2
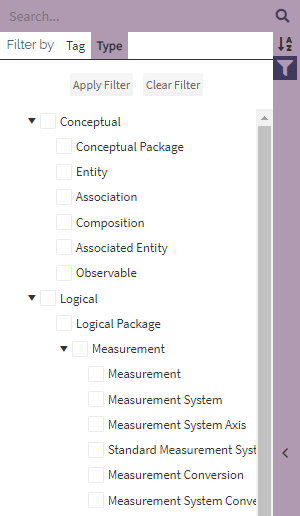
To filter by type, select the type that should be displayed in the Nav Tree. If no type is selected, all are shown; if one or more types are selected, only nodes of those types will be displayed.
Tagging
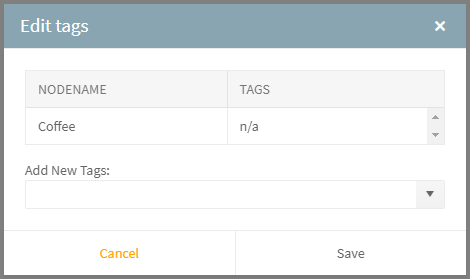
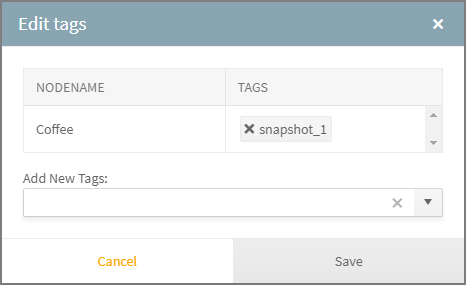
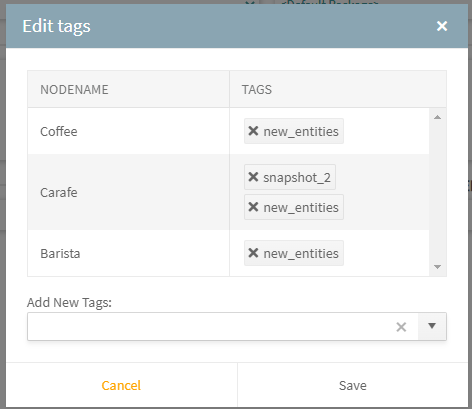
The user can add tags to an element from its details page (see the Data Model Details or Integration Model Details pages) or by right-clicking one or several elements in the Nav Tree. Either way, after clicking the "Edit tags" button, a dialog will show up.
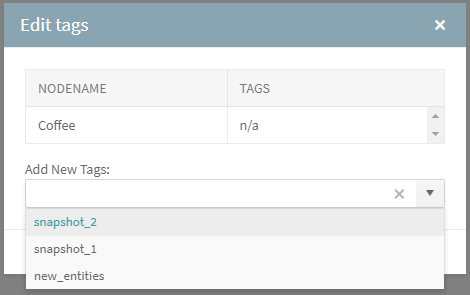
To add an existing tag, start typing it in the "Add New Tags" fields and select from the dropdown list. To add a new tag, type it in the field and press Enter. Once all the tags have been added, click Save.
If multiple elements are being edited, the selected tags will be applied to all.
