Integration Model to CinC Generation: Difference between revisions
No edit summary |
No edit summary |
||
| (9 intermediate revisions by 4 users not shown) | |||
| Line 2: | Line 2: | ||
== Create a UoP == | == Create a UoP == | ||
A UoP (Unit of Portability) represents your application. It defines all the inputs and outputs of the application by associating the data types (the queries and views defined in the data model) with the UoP. | |||
[[File:Generate_-_CreateUoP.png| | |||
Start by creating a UoP. CREATE >> INTEGRATION >> UOP | |||
Enter an appropriate name for the UoP and choose a parent package. | |||
After description, there are three drop down boxes. These are options specified by the FACE Technical Standard. At this point, you can choose any value. However, you may need to choose specific values when you run the UoP through the conformance test suite. See [[FACE UoP Options]] for more details. | |||
'''Message Ports / Connections''' | |||
In the data model, the views (queries) define the data types that are ultimately sent and received by the UoP (applications). Click "+ Add New Message Port" to add the corresponding data type to this application. | |||
* '''Name ''' Enter a name for the message port | |||
* '''Message Pattern''' This describes the general way messages are transmitted and works in conjunction with the Exchange Type (message direction). | |||
** '''Publish/Subscribe''' Publish/Subscribe indicates the messages will be (effectively) streamed. | |||
** '''Client''' indicate that some other pattern will be used and this message port will play act as a client | |||
** '''Server''' indicate that some other pattern will be used and this message port will play act as a server | |||
* '''Exchange Type''' Indicates if the data will be sent or received. | |||
* '''Message Type''' Select the view (query) corresponding to the data that will be sent/received. | |||
* '''Synchronization''' Indicates if the application blocks when sending or awaiting data. | |||
* '''Communication Style''' Indicates if the application sends a single message or manages a queue of messages | |||
* '''Period (s)''' The period (in seconds) indicates the rate the message should be sent/received | |||
For this first demonstration, choose: | |||
* ''Publish/Subscribe'' for the messaging pattern | |||
* ''Outbound'' for Exchange Type | |||
Click SAVE (near the upper right). | |||
Now, run through all the steps again to create a complementary UoP. Make sure you choose the same Message Type, but this time, choose ''' ''Inbound'' ''' for the Exchange Type. | |||
[[File:Generate_-_CreateUoP.png|border|800x800px]] | |||
== Create a UoP Instance == | == Create a UoP Instance == | ||
Since UoPs can be used in many different applications, UoP Instances are used to explicitly connect a UoP to an application. | |||
[[File:Generate_-_CreateUoPInstance2.png| | |||
A new UoP Instance can be created by selecting the corresponding option in the CREATE >> INTEGRATION >> UOP INSTANCE. | |||
After providing an appropriate name, select the UoP that corresponds to this instance. Click SAVE near the upper right corner. | |||
Repeat this process for the complementary UoP that you created in the previous section. | |||
[[File:Generate_-_CreateUoPInstance2.png|border|800x800px]] | |||
== Create an Integration Context == | |||
The Integration Context is a visual diagram of the interactions between a UoP and the configurable elements of CinC. | |||
[[File:Generate - CreateContext.png|none|thumb|800px]] | [[File:Generate - CreateContext.png|none|thumb|800px]] | ||
== Create a | Add UoP Instances that you created to the context. | ||
* Find the UoP Instances in the navigation tree and select it | |||
* Drag it onto the context. | |||
At this point, the two UoP (instances) exist, but they do not know how to communicate with each other. In this simplest of examples where the two UoPs are communicating using the same message, they can easily be integrated by using a Transporter block. | |||
* In the toolbar on the left side of the diagram find and select the transporter block | |||
* Drag the transporter block onto the diagram. | |||
A Transporter is a represents where the flow of data is occurring. However, it is a somewhat generic concept that needs further configuration. This is where you select the ''transport protocol''. | |||
* With the transporter block selected, on the right side find the Transport Channel control and click on the '+' to add a new channel | |||
* Give the channel a name and click the save icon. | |||
* Once the save completes, click on the transport channel drop down and select the name of the channel you just created. | |||
Now you are ready to connect the blocks to each other. | |||
* Select the first UoP Instance block in the diagram (this should be the "outbound" application) | |||
* Click on the up arrow at the upper right corner of the block and drag it to the transporter block | |||
* A popup dialog will allow you to select the UoP port to connect to the transporter, select the port from the drop down list and click on save (in this case, there is only one) | |||
* Select the Transporter block in the diagram | |||
* Click on the up arrow at the upper right corner of the transporter block and drag it to the second UoP Instance (this should be the "inbound" application) | |||
Up to this point, we have relied on the SAVE button to persist most of our changes. However, diagrams work a little differently. In order to persist diagrammed changes, you need to commit the changes. | |||
* Click the Commit button under the heading Model on the diagram tool bar. This saves the changes to the Integration Model (IM) elements but does NOT save the diagram. | |||
* Now, save the diagram. Click the middle disk icon under diagram in order to save the layout of the elements in the diagram. This saves the layout of the items in the diagram but does NOT save changes to the Integration or Deployment models that may have been made while editing the diagram elements. | |||
== Create a Main == | |||
The Main Program represents the executable program containing one (or more) UoPs and CinC. | The Main Program represents the executable program containing one (or more) UoPs and CinC. | ||
A new Main Program can be created by selecting the corresponding option in the CREATE >> DEPLOYMENT. | |||
After setting an appropriate name, 'the most important thing' is to add your UoP Instances to the executable. Look halfway down the page and there is a '''Contains UOP Instances''' heading with a list of UoP Instances. Use the drop down box at the bottom of that section to add your UoP Instances. | |||
Click SAVE near the upper right corner. | |||
[[File:Generate_-_CreateMainProgram2.png|none|thumb|800x800px]] | [[File:Generate_-_CreateMainProgram2.png|none|thumb|800x800px]] | ||
== Add a TPM == | == Add a TPM == | ||
The transport protocol module is responsible for the serialization and deserialization of messages and their transport from one TPM to another or another system. | The transport protocol module is responsible for the serialization and deserialization of messages and their transport from one TPM to another or another system. | ||
'''This step is optional as PHENOM will generate a UDP TPM by default.''' | |||
[[File:Generate - MainCreateTPM2.png|thumb|none|800px]] | [[File:Generate - MainCreateTPM2.png|thumb|none|800px]] | ||
# Within the Main detail page, after saving the main, click on the Create TPM button. | # Within the Main detail page, after saving the main, click on the Create TPM button. | ||
# Give the | # Give the TPM a name ('tpm' is fine). | ||
# | # Click the save button. | ||
# Commit the changes to the main by clicking the disk icon in the upper right. | # Commit the changes to the main by clicking the disk icon in the upper right. | ||
== Generate | == Generate CinC == | ||
This is the step where you will actually be transforming your model into a downloadable source code package. | |||
# | |||
* Open the 'Generate' section and click on the CinC submenu. | |||
# Select 'CinC' as the artifact. | |||
# Select the version of CinC you would like to generate | # Select the version of CinC you would like to generate | ||
# Select include CinC Source and choose Yes. | # Select include CinC Source and choose Yes. | ||
# Select the Main and UoP Instances for the context we created above and make sure they are both checked | # Select the Main and UoP Instances for the context we created above and make sure they are both checked | ||
# Select the appropriate license. | # Select the appropriate license. | ||
# Click on the Generate button and a zip file will be created. The .zip file will contain the | # Click on the Generate button and a zip file will be created. The .zip file will contain the CinC source, the data modeled FACE types used by the UoP and the CinC configuration files. Save the file and extract the generated code. | ||
[[File:Generate_-_CinC.png|none|thumb|800x800px]] | [[File:Generate_-_CinC.png|none|thumb|800x800px]] | ||
[[Category:UserGuide|0044_Integration_Model_to_CinC_Generation]] | |||
Latest revision as of 12:50, 13 January 2026
This sample workflow will lead the user to generate FACE 3 CinC after creating necessary Mains, UoP Instances, and UoPs.
Create a UoP
A UoP (Unit of Portability) represents your application. It defines all the inputs and outputs of the application by associating the data types (the queries and views defined in the data model) with the UoP.
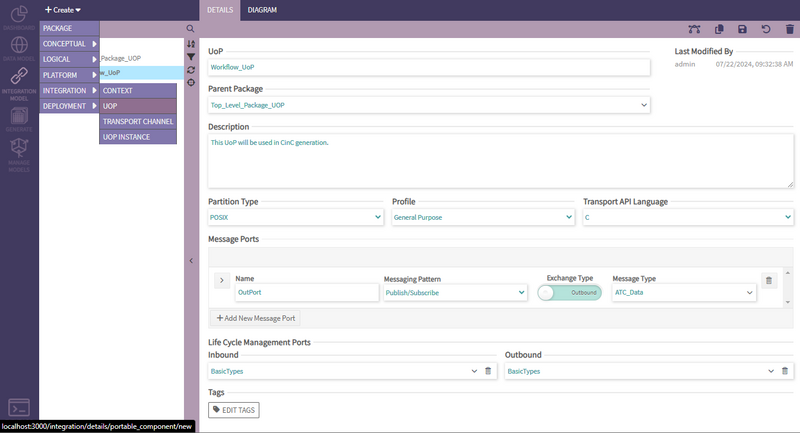
Start by creating a UoP. CREATE >> INTEGRATION >> UOP
Enter an appropriate name for the UoP and choose a parent package.
After description, there are three drop down boxes. These are options specified by the FACE Technical Standard. At this point, you can choose any value. However, you may need to choose specific values when you run the UoP through the conformance test suite. See FACE UoP Options for more details.
Message Ports / Connections In the data model, the views (queries) define the data types that are ultimately sent and received by the UoP (applications). Click "+ Add New Message Port" to add the corresponding data type to this application.
- Name Enter a name for the message port
- Message Pattern This describes the general way messages are transmitted and works in conjunction with the Exchange Type (message direction).
- Publish/Subscribe Publish/Subscribe indicates the messages will be (effectively) streamed.
- Client indicate that some other pattern will be used and this message port will play act as a client
- Server indicate that some other pattern will be used and this message port will play act as a server
- Exchange Type Indicates if the data will be sent or received.
- Message Type Select the view (query) corresponding to the data that will be sent/received.
- Synchronization Indicates if the application blocks when sending or awaiting data.
- Communication Style Indicates if the application sends a single message or manages a queue of messages
- Period (s) The period (in seconds) indicates the rate the message should be sent/received
For this first demonstration, choose:
- Publish/Subscribe for the messaging pattern
- Outbound for Exchange Type
Click SAVE (near the upper right).
Now, run through all the steps again to create a complementary UoP. Make sure you choose the same Message Type, but this time, choose Inbound for the Exchange Type.
Create a UoP Instance
Since UoPs can be used in many different applications, UoP Instances are used to explicitly connect a UoP to an application.
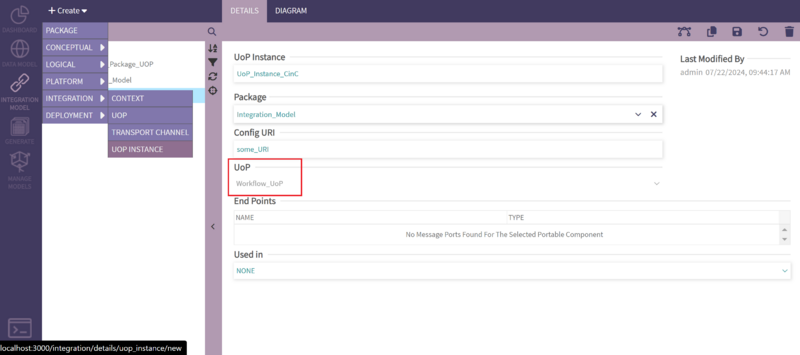
A new UoP Instance can be created by selecting the corresponding option in the CREATE >> INTEGRATION >> UOP INSTANCE.
After providing an appropriate name, select the UoP that corresponds to this instance. Click SAVE near the upper right corner.
Repeat this process for the complementary UoP that you created in the previous section.
Create an Integration Context
The Integration Context is a visual diagram of the interactions between a UoP and the configurable elements of CinC.
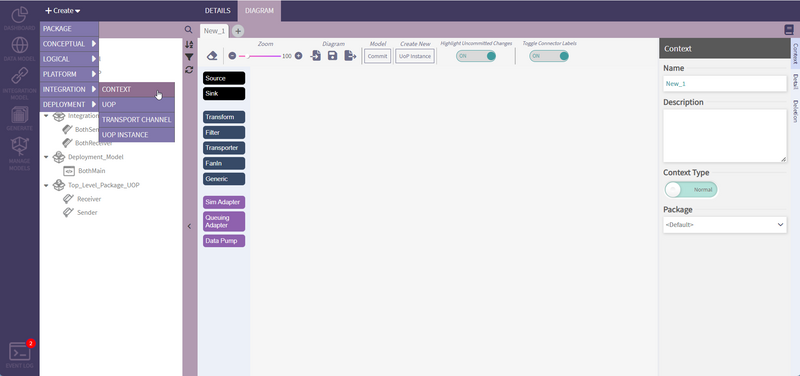
Add UoP Instances that you created to the context.
- Find the UoP Instances in the navigation tree and select it
- Drag it onto the context.
At this point, the two UoP (instances) exist, but they do not know how to communicate with each other. In this simplest of examples where the two UoPs are communicating using the same message, they can easily be integrated by using a Transporter block.
- In the toolbar on the left side of the diagram find and select the transporter block
- Drag the transporter block onto the diagram.
A Transporter is a represents where the flow of data is occurring. However, it is a somewhat generic concept that needs further configuration. This is where you select the transport protocol.
- With the transporter block selected, on the right side find the Transport Channel control and click on the '+' to add a new channel
- Give the channel a name and click the save icon.
- Once the save completes, click on the transport channel drop down and select the name of the channel you just created.
Now you are ready to connect the blocks to each other.
- Select the first UoP Instance block in the diagram (this should be the "outbound" application)
- Click on the up arrow at the upper right corner of the block and drag it to the transporter block
- A popup dialog will allow you to select the UoP port to connect to the transporter, select the port from the drop down list and click on save (in this case, there is only one)
- Select the Transporter block in the diagram
- Click on the up arrow at the upper right corner of the transporter block and drag it to the second UoP Instance (this should be the "inbound" application)
Up to this point, we have relied on the SAVE button to persist most of our changes. However, diagrams work a little differently. In order to persist diagrammed changes, you need to commit the changes.
- Click the Commit button under the heading Model on the diagram tool bar. This saves the changes to the Integration Model (IM) elements but does NOT save the diagram.
- Now, save the diagram. Click the middle disk icon under diagram in order to save the layout of the elements in the diagram. This saves the layout of the items in the diagram but does NOT save changes to the Integration or Deployment models that may have been made while editing the diagram elements.
Create a Main
The Main Program represents the executable program containing one (or more) UoPs and CinC.
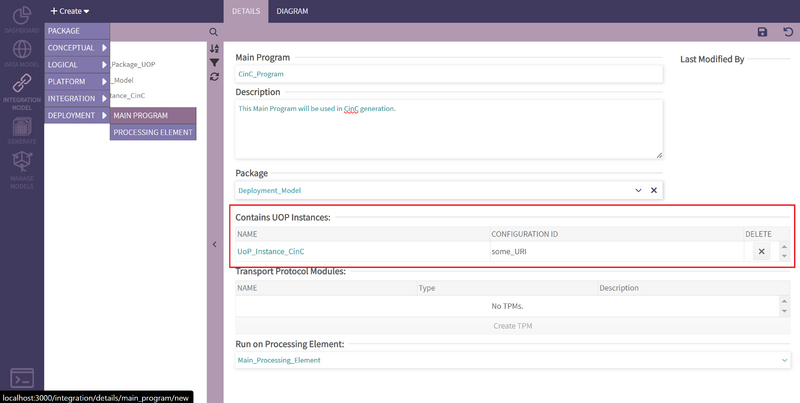
A new Main Program can be created by selecting the corresponding option in the CREATE >> DEPLOYMENT.
After setting an appropriate name, 'the most important thing' is to add your UoP Instances to the executable. Look halfway down the page and there is a Contains UOP Instances heading with a list of UoP Instances. Use the drop down box at the bottom of that section to add your UoP Instances.
Click SAVE near the upper right corner.
Add a TPM
The transport protocol module is responsible for the serialization and deserialization of messages and their transport from one TPM to another or another system.
This step is optional as PHENOM will generate a UDP TPM by default.
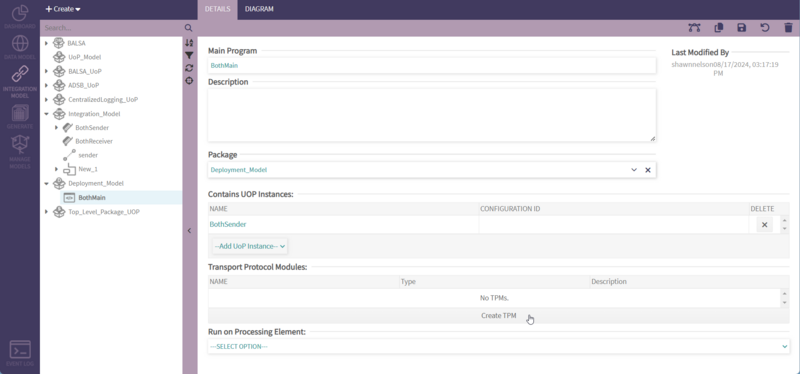
- Within the Main detail page, after saving the main, click on the Create TPM button.
- Give the TPM a name ('tpm' is fine).
- Click the save button.
- Commit the changes to the main by clicking the disk icon in the upper right.
Generate CinC
This is the step where you will actually be transforming your model into a downloadable source code package.
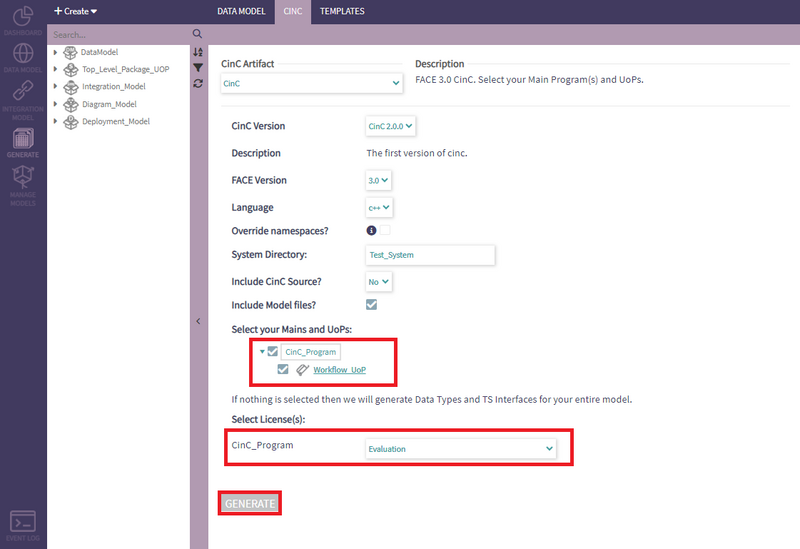
- Open the 'Generate' section and click on the CinC submenu.
- Select 'CinC' as the artifact.
- Select the version of CinC you would like to generate
- Select include CinC Source and choose Yes.
- Select the Main and UoP Instances for the context we created above and make sure they are both checked
- Select the appropriate license.
- Click on the Generate button and a zip file will be created. The .zip file will contain the CinC source, the data modeled FACE types used by the UoP and the CinC configuration files. Save the file and extract the generated code.
