CSV: Difference between revisions
Update to the CSV import page after refactor |
|||
| (10 intermediate revisions by one other user not shown) | |||
| Line 1: | Line 1: | ||
The CSV import tool allows users to bulk import data into their model. | The CSV import tool allows users to bulk import data into their model, both creating new nodes and editing existing nodes. | ||
[[File: | [[File:Csv before import.png|frameless|1199x1199px]] | ||
Simply select a CSV file to import which is less than 5MB, and press the import button. Depending on the size of the file, it may take some time to process. | |||
When the processing is finished, an error message will appear if the columns in the CSV file do not fit any of the acceptable formats. If the imported CSV file is valid, a table will appear for review displaying all of the created and edited nodes, as well as a summary of the import. | |||
[[File: | [[File:Csv after import.png|frameless|1190x1190px]] | ||
Visible in the list is the following information about the processed node: | |||
* Row Number (corresponding to the CSV line number in which the node was created or edited) | |||
* Node Name | |||
* Node Validity | |||
* Node Type | |||
* Node Guid (If this would be a new node, the guid would be replaced with "New") | |||
There are many actions to take on this table, including: | |||
* Nodes may be manually selected or unselected to be saved using the check box in the far left of the row. All rows are selected by default. | |||
* Select a node to see and potentially edit its attributes. If the node is not valid, the node must be edited before finishing the import. | |||
* Reset any manual edits made to the node using the far right column in the row. | |||
To save the changes displayed to the model, press the "FINISH IMPORT" button. Navigating away before pressing this button will not save any of the processed nodes. | |||
== CSV Header Formats == | |||
Valid formats a user can import are: | |||
* Views & View Characteristics (see [[Formatting a CSV for View Import]]) | |||
* Enumerations (see [[Formatting a CSV for Enum Import]]) | |||
* Entities & Associations (see [[Formatting a CSV for Entities and Associations Import]]) | |||
* Constraints | |||
* Platform Types | |||
* UoPs | |||
Latest revision as of 15:49, 15 December 2025
The CSV import tool allows users to bulk import data into their model, both creating new nodes and editing existing nodes.
Simply select a CSV file to import which is less than 5MB, and press the import button. Depending on the size of the file, it may take some time to process.
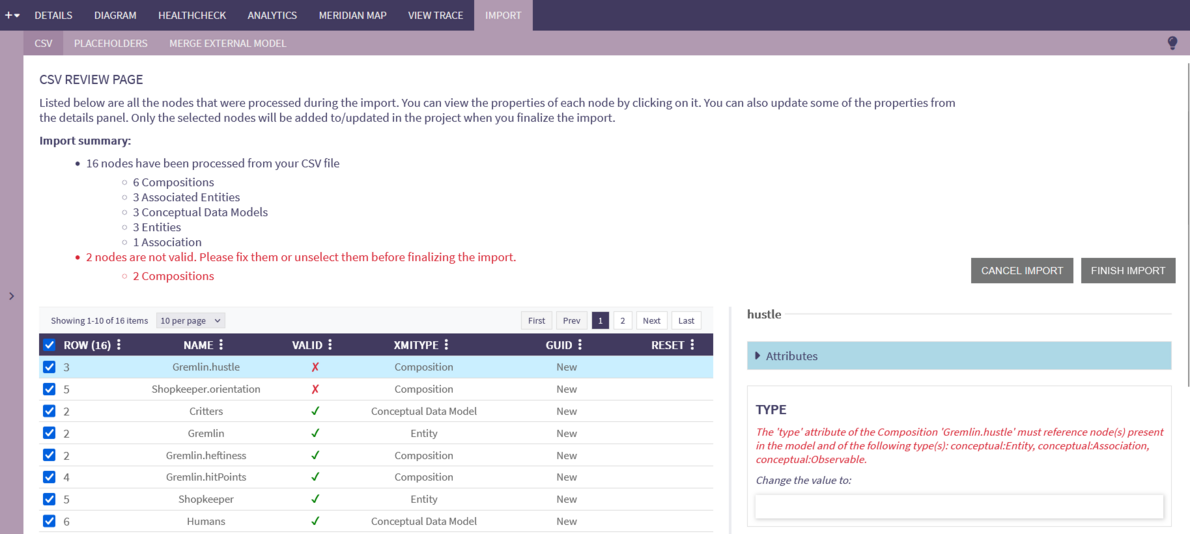
When the processing is finished, an error message will appear if the columns in the CSV file do not fit any of the acceptable formats. If the imported CSV file is valid, a table will appear for review displaying all of the created and edited nodes, as well as a summary of the import.
Visible in the list is the following information about the processed node:
- Row Number (corresponding to the CSV line number in which the node was created or edited)
- Node Name
- Node Validity
- Node Type
- Node Guid (If this would be a new node, the guid would be replaced with "New")
There are many actions to take on this table, including:
- Nodes may be manually selected or unselected to be saved using the check box in the far left of the row. All rows are selected by default.
- Select a node to see and potentially edit its attributes. If the node is not valid, the node must be edited before finishing the import.
- Reset any manual edits made to the node using the far right column in the row.
To save the changes displayed to the model, press the "FINISH IMPORT" button. Navigating away before pressing this button will not save any of the processed nodes.
CSV Header Formats
Valid formats a user can import are:
- Views & View Characteristics (see Formatting a CSV for View Import)
- Enumerations (see Formatting a CSV for Enum Import)
- Entities & Associations (see Formatting a CSV for Entities and Associations Import)
- Constraints
- Platform Types
- UoPs

