Developing an Entity Model: Difference between revisions
| Line 105: | Line 105: | ||
[[File:Phenomportal tutorial dm refactor destination.png|thumb|none]] | [[File:Phenomportal tutorial dm refactor destination.png|thumb|none]] | ||
In the drop-down, select "Climbing_Wall" | In the drop-down, select "Climbing_Wall." PHENOM will run a quick test to ensure the move is valid and then it will give you a brief warning: | ||
[[File:Phenomportal tutorial dm refactor impact.png|thumb|none]] | [[File:Phenomportal tutorial dm refactor impact.png|thumb|none]] | ||
| Line 111: | Line 111: | ||
Go ahead and click CONFIRM MOVE. Then, open the Climbing_Wall entity and you should see that the "grade" attribute has been moved into that entity. | Go ahead and click CONFIRM MOVE. Then, open the Climbing_Wall entity and you should see that the "grade" attribute has been moved into that entity. | ||
{{info | heading= A Few Notes about Refactor... | 1=Refactor is a very powerful tool. If you have already documented interfaces that point to Wall.grade, refactor will automagically fix your path to say Wall.route.grade. That's one of the reasons that PHENOM won't let you pick ''any'' entity - you are constrained to picking an entity that is composed into the attribute's current entity. Skayl's developers are actively developing additional refactoring options that will possibly result in some more impactful events. The "impact summary" that appears in that second dialog will get a lot more interesting!}} | |||
{{info | heading= A Few Notes about Refactor... | 1=Refactor is a very powerful tool. If you have already documented interfaces that point to Wall.grade, refactor will automagically fix your path to say Wall.route.grade. That's one of the reasons that PHENOM won't let you pick any entity - you are constrained to picking an entity that is composed into the attribute's current entity. Skayl's developers are actively developing additional refactoring options that will possibly result in some more impactful events. The " impact summary" that appears in that second dialog will get a lot more interesting!}} | |||
==Create the Climber== | ==Create the Climber== | ||
Revision as of 13:45, 5 August 2022
Data Modeling is often a tedious process. It requires users to draw arrows in the right direction, create boxes with the correct labels. PHENOM makes this process much simpler. In this tutorial, we will walk through the construction, editing, and refactor of a simple entity model using the tools in PHENOM.
This tutorial will teach you how to create:
- Packages
- Entities
- Attributes
- Associations
Getting Prepared
Although you don't have to be a data modeling expert you do have to be a subject matter expert. If you aren't an expert, you should at least know a little something about the content you are trying to document. This tutorial was birthed in a training class where the attendees were really excited about rock climbing so we used their enthusiasm (and knowledge) to build a simple rock climbing data model.
For this exercise, we need to think about rock climbing and how we might organize some relationships between those things. The process is somewhat similar to building a highly normalized database schema, however, this tutorial will focus on the mechanics of building the data model instead of how to organize the information.
First Things First
Log into PHENOM. And click on the DATA MODEL icon.

Let's create a folder for the project. In the top-right quarter of the screen, you should see a create button. Click on that, and in the drop down, select Package.

For the name, enter "Rock_Climbing" - using a name like "Rock Climbing" will result in an invalid identifier error since spaces are not allowed.
For TYPE, choose CONCEPTUAL. This will create a package that can store conceptual items.
For PARENT PACKAGE, choose <ROOT>. This will create a package in the top level of the model.
Leave description blank for now.

In the upper right corner of this editor, click the SAVE button.

Now, the new ROCK_CLIMBING package should be visible in the NAV TREE.
Creating Your First Entity
Click on the Rock_Climbing package. This will ensure that your new entity is created in the correct place. If it isn't, that's okay. It can be dragged into the correct folder as needed.
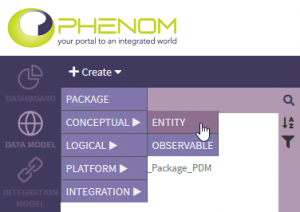
Just like before, click on the CREATE button, however, this time, click on CONCEPTUAL → ENTITY in the drop down menu.

For the entity name, type "Wall". You may leave description blank.
Now, there is checkbox there that says, "Add UniqueIdentifier attribute". Make sure that is checked. This will save us a little work in a couple of minutes.
Click SAVE.
Tada! You have successfully created your first entity.
Uh Oh. WHERE IS MY ENTITY!?!?! Your entity didn't appear in the Rock_Climbing package? Bummer. Take a look under PhenomEntities. Yeah...that's what I thought. Sorry about that. Just drag it into the Rock_Climbing package and remember this trick for later. (wink) |
Adding Attributes
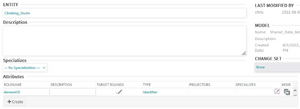
Now that you've found your Wall entity and located it your Rock_Climbing package, double-click on it. This will open it up in the DETAILS viewer. In this view, you should see that one attribute has been added to your entity.

We really need to think about the kind of things we might need to document about our climbing wall. Let's start by adding a property to capture the general size of the wall.
Click the create button and a new line will be added to the list of attributes.

Enter "dimensions" for "enter new rolename." Don't worry about the description for now. Click in the TYPE box and scroll down to Extent. While this list is alphabetical, it lists "entities" first and then "associations", and then finally "observables" - so you are going to have to scroll down lower into the list.
Let's add one more attribute. Click "+Create" again and add an attribute named "grade" of type "Kind."
Click SAVE.
Composing an Entity
If you've ever been to a climbing gym, you may have noticed all of the little colored flags on the grips. These demarcate a "route" of a particular difficulty along with some other properties. As such, the route is not represented as a simple observable. Let's create another entity called Climbing_Route.

See if you can follow the steps above to create it.
Click SAVE.
Now, navigate back to wall. Click "+Create" to add a new attribute called "route" and, in the drop-down, select the new entity, "Climbing_Route."
Click SAVE.
Refactoring...
Now that we've created a route, we realize that the difficulty, or grade, is actually attached to the route instead of the wall. Let's fix that.
In the NavTree, expand the attributes under Wall by click on the small triangle and right-click on grade attribute.
This will popup a short menu with a "Move Attribute" action.

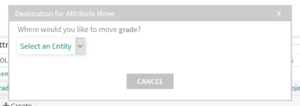
Click on that option and PHENOM will present the following dialog:

In the drop-down, select "Climbing_Wall." PHENOM will run a quick test to ensure the move is valid and then it will give you a brief warning:

Go ahead and click CONFIRM MOVE. Then, open the Climbing_Wall entity and you should see that the "grade" attribute has been moved into that entity.
A Few Notes about Refactor... Refactor is a very powerful tool. If you have already documented interfaces that point to Wall.grade, refactor will automagically fix your path to say Wall.route.grade. That's one of the reasons that PHENOM won't let you pick any entity - you are constrained to picking an entity that is composed into the attribute's current entity. Skayl's developers are actively developing additional refactoring options that will possibly result in some more impactful events. The "impact summary" that appears in that second dialog will get a lot more interesting! |
Create the Climber
Although climbing walls are great, they are far better if we have some climbers that use them! So, let's create a rock climber entity.
Use PHENOM to create the following Entity. (HINT: if you let PHENOM automatically create the unique identifier attribute, you can rename it in the details page.)
[PHENOM Knowledgebase > Exercise: Developing an Entity Model > image2020-2-28_17-51-15.png]
How Many Times Did I Climb That?
Consider that we might want to count the number of times a climber has tried a climbing route. In which entity should we store that data? The climber? The wall? The route?
The answer is, none of them. If we put a counter in any of those, it would most like be pretty ambiguous. A counter on the wall would possibly be the number of climbs on the wall. And on the climber, the number of climbs the climber has.
For this, we need data to relate the Climber and the Climb_Route. Since this is relational data, we use an association. Fortunately, you pretty much know how to create one already.
Start by CREATING a new ENTITY called "Climbs_on_Route" and add an attribute called "number_of_climbs" with a type of "Count."
In the box immediately below the Attribute box, there is another box called "Associated Entities."
Using the "+Create" button, go ahead and create two associated entities as shown below:
This association is relating the Climber and the Climbing_Route to one another and describes something (the number of climbs) about that relationship.
Click SAVE.
NOTE: At a very minimum, you must add two associated entities. It is possible to select the same entity twice (you could point to Climber two times), but it is important that you have a clear reason for doing so. In this case, maybe you are modeling a climbing buddy.
Extra Navigation in PHENOM
PHENOM provides several tools for navigation the types of relationships we just created. Let's take a look at those by going back to the Climbing_Wall entity and scroll down to the box labeled "Composed In". You should see that "Wall" is listed in this box. This shows you all of the other entities that compose the current entity.
Below that, there is a box called "Associated In." In there, you can see the association(s) that point to this entity.
Along the top of the details panel (and below the toolbar with the CREATE button), you should see a DIAGRAM tab. Click on that.
Drag your rock climbing entities and association into the diagram from the NavTree. Te resulting diagram should look a little something like the one below. My project has a couple of subtle differences.
[PHENOM Knowledgebase > Exercise: Developing an Entity Model > image2020-2-28_18-4-39.png]
Wrapping Up
That's it! You've exercised most of the basic features in PHENOM's Entity Modeler. You have learned how to create basic entities, add simple attributes (observables), add composed attributes, create associations, add associated entities, use basic diagramming capabilities, and perform basic refactoring.