CinC Generation: Difference between revisions
mNo edit summary |
|||
| Line 5: | Line 5: | ||
== FACE 3 CinC == | == FACE 3 CinC == | ||
== This options generates a FACE 3.0 aligned CinC using the parameters provided by the user: == | === This options generates a FACE 3.0 aligned CinC using the parameters provided by the user: === | ||
* Model Namespace: namespace that will be used throughout the generated code | * Model Namespace: namespace that will be used throughout the generated code | ||
* System Directory: name of the folder where the dynamic CinC source will be generated | * System Directory: name of the folder where the dynamic CinC source will be generated | ||
| Line 21: | Line 21: | ||
[[File:Phenom-generate-cinc face3 mock uop.png|600px|border]] | [[File:Phenom-generate-cinc face3 mock uop.png|600px|border]] | ||
== Sample Workflow == | |||
This sample workflow will lead the user to generate CinC using Mains, UoP Instances, and UoPs. | |||
Firstly, the user needs to create a UoP to be used by a UoP Instance within the model. A new UoP can be created by selecting the corresponding option in the 'Create>Integration' dropdown and then saving after inputting the necessary data. | |||
[[File:Generate - CreateUoP.png|none|thumb|800x800px]] | |||
Once the user has created their UoP it is now time to create the UoP Instance that will be used in CinC generation. This UoP Instance is going to be very important for later steps. | |||
Similarly, A new UoP Instance can be created by selecting the corresponding option in the 'Create>Integration' dropdown and then saving after inputting the required data . | |||
[[File:Generate - CreateUoPInstance2.png|none|thumb|800x800px]] | |||
Next, the user needs to create a Main Program to be used during CinC. This is the Main Program that will house our UoP Instance and should be selected during creation. | |||
A new Main Program can be created by selecting the corresponding option in the 'Create>Deployment' dropdown and then saving after inputting the needed data including the UoP Instance. | |||
[[File:Generate - CreateMainProgram2.png|none|thumb|800x800px]] | |||
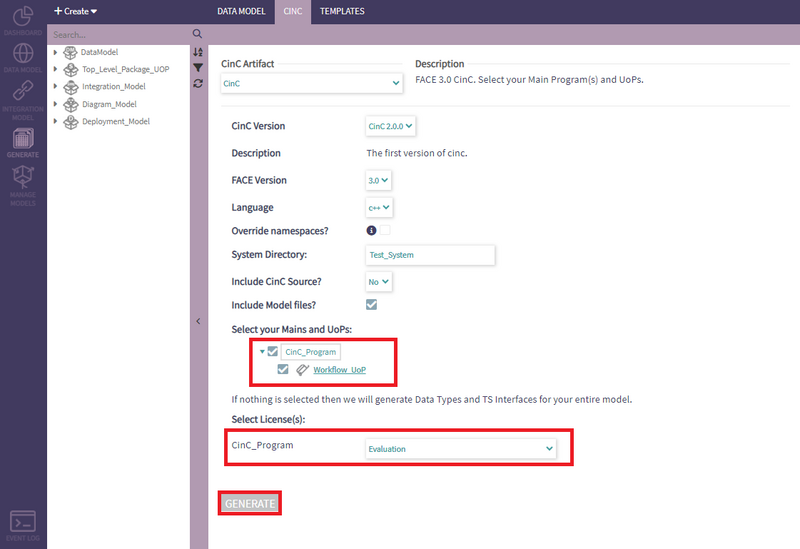
Next the user needs to open the 'Generate' section and click on the CinC submenu. | |||
The user should select 'CinC' as the artifact. For the generation config, the user should decide which changes to make depending on their setup. Only include CinC source if you have the required files. After setting up the CinC config, the user needs to now select their Mains and UoPs by using their checkboxes. Next, for each Main Program, the user will select an available CinC license. | |||
Finally, the user will click the 'Generate' button to generate FACE 3.0 CinC and a .zip file will be created for download. | |||
[[File:Generate - CinC.png|none|thumb|800x800px]] | |||
Revision as of 12:28, 22 July 2024
CinC is Skayl's Configurable Infrastructure Capability. This is a fully configured FACE Transport Service that can be easily configured in PHENOM. This tab contains all the controls needed to export FACE-aligned software. Two types of products can be created.
FACE 3 CinC
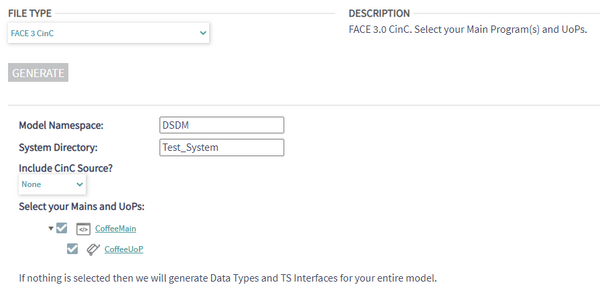
This options generates a FACE 3.0 aligned CinC using the parameters provided by the user:
- Model Namespace: namespace that will be used throughout the generated code
- System Directory: name of the folder where the dynamic CinC source will be generated
- Include CinC Source: whether or not the static CinC source files should be generated. If "None" is selected, only the files in the System directory will be generated
- Select your Mains and UoPs: selection of the Mains and the UoPs within the Mains that will be generated
FACE 3 Mock UoPs
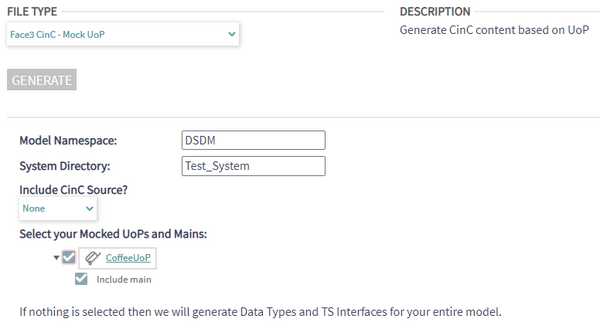
This options generates a FACE 3.0 aligned CinC with mock UoPs using the parameters provided by the user:
- Model Namespace: namespace that will be used throughout the generated code
- System Directory: name of the folder where the dynamic CinC source will be generated
- Include CinC Source: whether or not the static CinC source files should be generated. If "None" is selected, only the files in the System directory will be generated
- Select your Mocked UoPs and Mains: selection of the UoPs to generate. For each UoP, the "Include main" option, if selected, will generate a mock Main for the mock UoP.
Sample Workflow
This sample workflow will lead the user to generate CinC using Mains, UoP Instances, and UoPs.
Firstly, the user needs to create a UoP to be used by a UoP Instance within the model. A new UoP can be created by selecting the corresponding option in the 'Create>Integration' dropdown and then saving after inputting the necessary data.
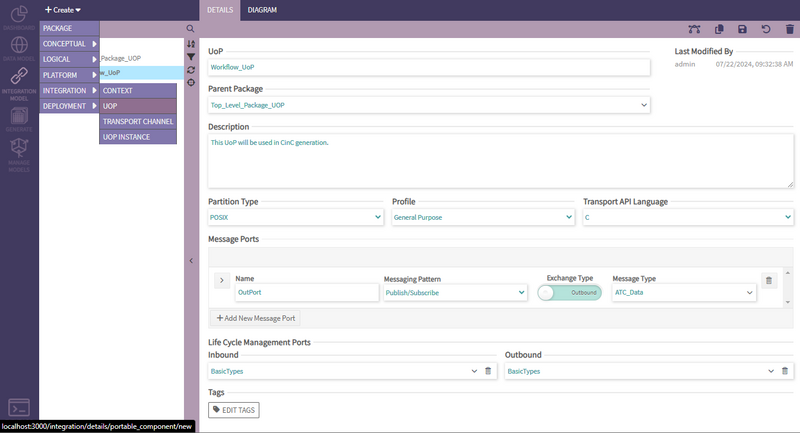
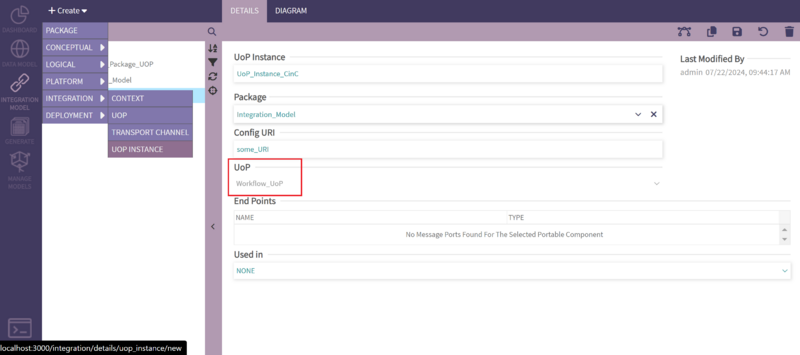
Once the user has created their UoP it is now time to create the UoP Instance that will be used in CinC generation. This UoP Instance is going to be very important for later steps.
Similarly, A new UoP Instance can be created by selecting the corresponding option in the 'Create>Integration' dropdown and then saving after inputting the required data .
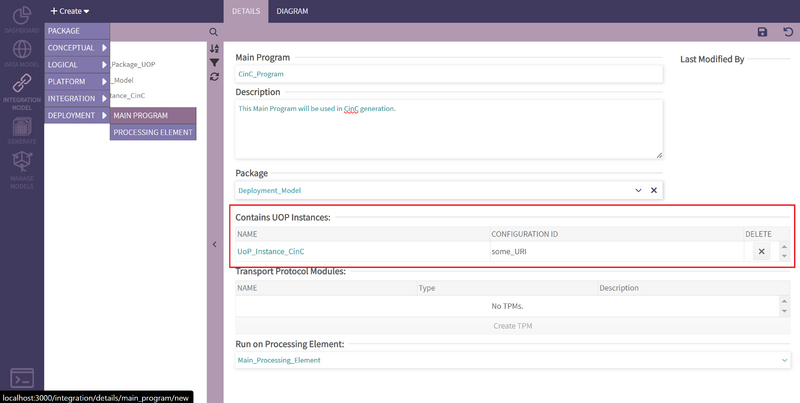
Next, the user needs to create a Main Program to be used during CinC. This is the Main Program that will house our UoP Instance and should be selected during creation.
A new Main Program can be created by selecting the corresponding option in the 'Create>Deployment' dropdown and then saving after inputting the needed data including the UoP Instance.
Next the user needs to open the 'Generate' section and click on the CinC submenu.
The user should select 'CinC' as the artifact. For the generation config, the user should decide which changes to make depending on their setup. Only include CinC source if you have the required files. After setting up the CinC config, the user needs to now select their Mains and UoPs by using their checkboxes. Next, for each Main Program, the user will select an available CinC license.
Finally, the user will click the 'Generate' button to generate FACE 3.0 CinC and a .zip file will be created for download.
