Permissions
Permissions are a user's access level to either a project or a model. There are four different types of permissions, and a user can have any of the permissions types independent of one another. Permissions on a project and the models it contains are distinct (i.e., the user can have different permissions (higher or lower) at the project level compared to the models).
Permissions Types
Read Permissions
If a user has Read permissions, they have read-only access to the project or model.
Having Read permissions to a project and its models allows the user to switch to that project, see all the content, export the content, but not create, edit, or update it. In addition, if the model inherits from another model, a user with Read permissions is allowed to see the nodes that can be pulled from a parent model, but are prevented from actually pulling that content. Likewise, if a model has other models that inherit from it, a user with Read permissions to the model is allowed to see the push requests from the children models, but is not allowed to approve those changes.
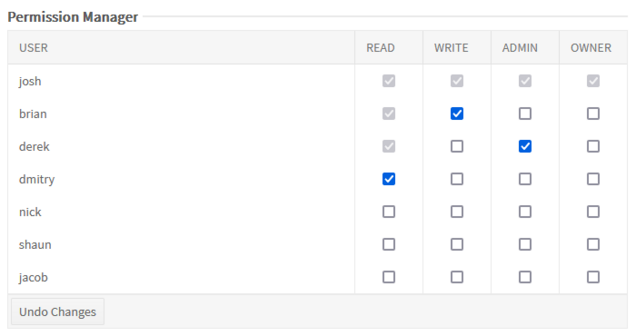
Read permissions are unique from the other permissions types in that they are required in order to have any other permissions. For that reason, when assigning Write, Admin, or Owner permissions, Read permissions are assigned by default and can't be removed, as seen below.
Write Permissions
If a user has Write permissions, they are allowed to edit project and model content.
Having Write permissions to a project or a model allows the user to modify any of its content, including pulling, pushing, and approving push requests. Note that to pull changes from a parent model, the user needs at least Read permissions to the parent model.
Admin Permissions
If a user has Admin permissions, they are allowed to share the project or model and inherit from it
Having Admin permissions to a project or a model allows the user to create inheriting projects or models. Admin users can also assign permissions types (provided the user has those types) of other users belonging to their own account for this project or model
Owner Permissions
If a user has Owner permissions, they have the same permissions as Admins, as well as some additional actions.
Having Owner permissions to a project or a model provide the user with Admin permissions plus the ability to delete the project or model, to change the metadata of it, and to share it with users external to their account. Owner users can grant all permissions types (provided the user has those types) for internal users, including Owner, while the user may only assign Read, Write, and Admin for external users.
Assign Permissions
Assign Permissions to Internal Users
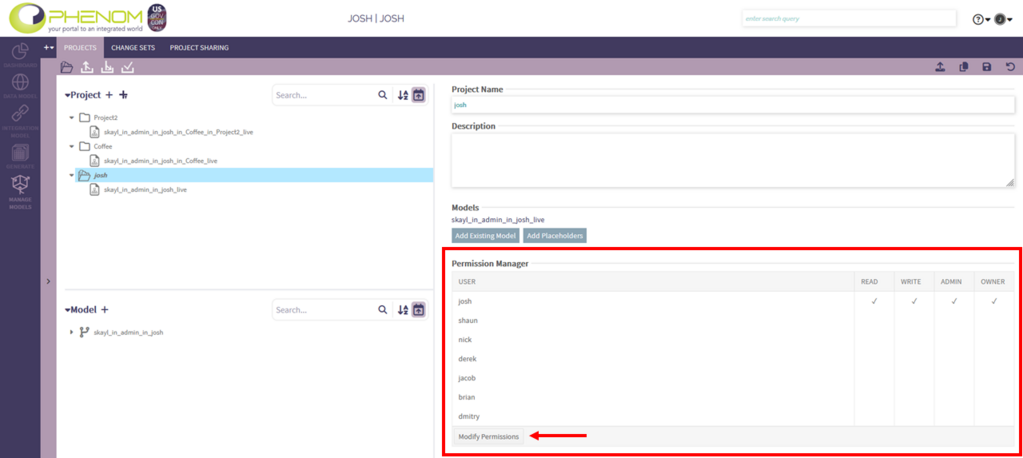
Users are able to assign permissions to their projects or models by using the Permission Manager on the Project or Model Details page. The table lists all the users from the same account as the current user.
To be able to share a Model, users need to have Admin or Owner permissions to it. The types of permissions users can grant depend on the the permissions they have to the model.
To be able to share a Project, users need to have Admin or Owner permissions to it and to all the models it contains. The types of permissions users can grant depend on the the permissions they have to the project and its models. The type permissions granted for the project will be applied to all its models.
| Current User Permissions | Target User Permissions Options |
|---|---|
| Read + Admin | Read, Admin |
| Read + Admin + Owner | Read, Admin, Owner |
| Read + Write + Admin | Read, Write, Admin |
| Read + Write + Admin + Owner | Read, Write, Admin, Owner |
Assign Permissions to External Users
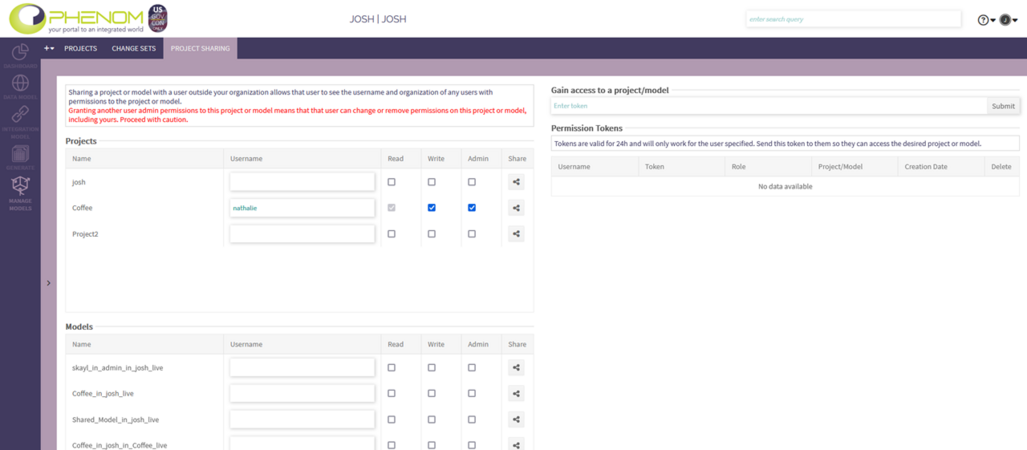
To assign permissions to users that do not belong to the current user's account, the user has to give them a Permissions Token. The procedure to do so is as follows:
- Go to the Project Sharing page
- Locate the project or model to be shared
- Enter the username and the desired permissions level*
- Click the Share button
- Email the generated Token (which appeared on the right of the screen) to the user.
Note that the Token is only valid for 24 hours.
* The types of permissions users can grant follow the same policy as for internal users (see table above) except that they can't grant Owner permissions even if they have Owner permissions themselves.
To gain access to the project or model, the user has to go to the Project Sharing page, copy the Token received by email in the dedicated field and click the Submit button. The new project or model should then appear in the their project/model tree.
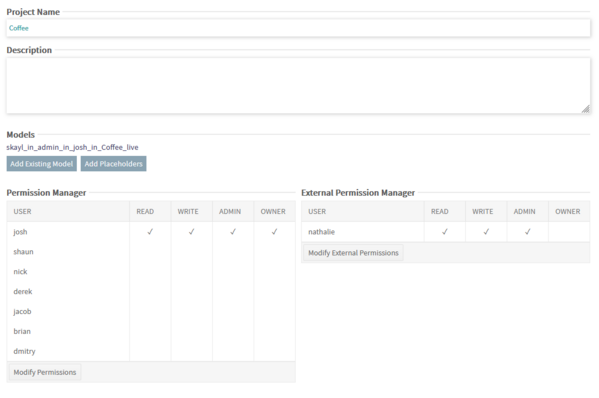
This user, along with any other external users, will appear in the Permissions Manager under a separate External Users table.
Account Admins
Account admins are able to see all the projects and models that users from their account have access to, and are able to assign permissions to those projects and models to any user in their account.
For internally created projects or models, Account admins can grant any types of permissions (including Owner) to any user in their account.
For a project or model that was externally shared with one (or more) of their account users, the Account admin can only assign permissions to other users if at least one of those original users was granted Admin permissions. In addition, if no one was granted Write access to the project or model, then Account admins will not be allowed to grant Write permissions to anyone, only Read and Admin.


