Projects and Models Management: Difference between revisions
No edit summary |
|||
| (28 intermediate revisions by 3 users not shown) | |||
| Line 9: | Line 9: | ||
A model in and of itself might not constitute a complete, compliant, or even valid project as it might depend on entities inside other models, making it impossible to load independently. However, by combining several models in a project, they can form a complete, compliant, and valid model. | A model in and of itself might not constitute a complete, compliant, or even valid project as it might depend on entities inside other models, making it impossible to load independently. However, by combining several models in a project, they can form a complete, compliant, and valid model. | ||
[[File:Phenom-manage-project model structure1.png|600px]] | [[File:Phenom-manage-project model structure1.png|600px|border]] | ||
The following diagram depicts how a model can be part of multiple projects. | The following diagram depicts how a model can be part of multiple projects. | ||
[[File:Phenom-manage-project model structure2.png|600px]] | [[File:Phenom-manage-project model structure2.png|600px|border]] | ||
Once a project is loaded into PHENOM, the node contents of its constituent models can be added to as well as edited. | Once a project is loaded into PHENOM, the node contents of its constituent models can be added to as well as edited. | ||
== Projects Management == | |||
When in PHENOM > Manage Models > Projects, the user can see the projects and models they have access to. | |||
[[File:Phenom-manage-projects models list.png|500px|border]] | |||
[[File:Phenom-manage- | The project you are currently working on is displayed at the top of all the pages. Additionally, in the Manage Projects page, the active project is the expanded by default and has a different icon. | ||
[[File:Phenom-manage-active project.png|600px|border]] | |||
To create a project, the user can click on the + button in the Projects list and then select existing models, import new FACE models, or add new blank models. | To create a project, the user can click on the + button in the Projects list and then select existing models, import new FACE models, or add new blank models. | ||
| Line 30: | Line 31: | ||
There are three ways a user can have access to a project or a model: | There are three ways a user can have access to a project or a model: | ||
* | * The user creates it | ||
* | * The user uploads it | ||
* | * The user is assigned permissions from an external user | ||
The user will see, for each model, its inheritors and versions. | The user will see, for each model, its inheritors and versions. | ||
== Model | The user can easily switch between projects in the Projects Management page. | ||
[[File:Phenom-manage-switch-project-2.png|border|800x800px]] | |||
== Model Versions == | |||
In PHENOM, models maintain the content as well as the record of changes made to that content. | In PHENOM, models maintain the content as well as the record of changes made to that content. | ||
By default, each model has a "live" version. This is the version of the model which, when loaded in a project | |||
When the user is satisfied with the current state of a model, | By default, each model has a "live" version. This is the version of the model which, when loaded in a project can be edited and amended. | ||
In the example below, the | |||
When the user is satisfied with the current state of a model, they can publish it, thus creating a “static” version of that model. A published version of a model is a snapshot of its content at one point in time. It cannot be added to or edited but can still be included in a project, referenced by and depended upon by the contents of a different model. | |||
The same | In the example below, the model version FACE_SDM_306 and FACE_SDM_316 are a "published" version of the FACE_SDM model. While it can be shared with other users, included in a project, and referred to and depended upon by other models, it can never be edited. In the Model tree, all published models have their publication dates displayed for ease of use. | ||
When a user chooses to include in a | |||
At first, the inheriting and the parent | [[File:Phenom-manage-published model.png|600px|border]] | ||
A user can see the relationships between | |||
In this example, the | == Model Inheritance & Content Merging == | ||
The same model can be loaded as a part of several different projects. However, the users of those projects will not be able to edit the content of the model simultaneously. | |||
When a user chooses to include in a project a model which is already a part of a different project, a "child" model will be created. This inheriting or "child" model is not a different version of a model, but rather its own model which inherits some portion of its content. | |||
This section goes over a sample workflow which employs the PHENOM model structure concepts described in the sections above. | At first, the inheriting and the parent models are identical but as their respective user make changes, they grow apart. Therefore, it’s possible for this "child" model to merge its changes to and from the parent model. | ||
A user can see the relationships between models in Manage Models > Projects > Model. | |||
In this example, the model Coffee is the parent of the model Coffee_in_Coffee_2. This results from the Coffee_live version of the Coffee model being loaded into a new project. When edits are made in either the parent or child model, the changes can be merged between them. | |||
[[File:Phenom-manage-model branching.png|600px|border]] | |||
Clicking on a live or published model will display its characteristics on the right panel. The user will be able to edit some of the model's characteristics and the permissions of the model, provided the user has Admin or Owner privileges for that model. | |||
[[File:Phenom-manage-model details2.png|border|800x800px]] | |||
== Copy Project == | |||
Copying a project allows for easy cloning of project content with just a click of a button. The resulting project will contain a child of all the live models of the source project and the same published models. | |||
To copy a project, the user just needs to select a project from their project tree and click the copy project icon on the top-right. | |||
[[File:Manage - Copybtn.png|none|800px]] | |||
The copy project screen closely resembles the project creation screen, requiring the user to input a new name and description for the new project. Additionally, the user must choose whether to copy the existing permissions from the source project to the copied project before saving. | |||
[[File:Manage - CopyCreate.png|none|800px]] | |||
== Sample Workflow == | |||
This section goes over a sample workflow which employs the PHENOM project and model structure concepts described in the sections above. | |||
In the scenario laid out below, a group of users, Chris, Dave, Nick, and Riley are working on different parts of completing a data model and documenting a set of interfaces against it. Each of them plays a slightly different role in the process, and they will use some of PHENOM's Model management features to keep their work organized. | In the scenario laid out below, a group of users, Chris, Dave, Nick, and Riley are working on different parts of completing a data model and documenting a set of interfaces against it. Each of them plays a slightly different role in the process, and they will use some of PHENOM's Model management features to keep their work organized. | ||
Chris is working on updating the Shared Data Model (SDM) the group is using to conform to the latest changes released in an accepted standard. | === Part 1 – Chris === | ||
Chris is working on updating the Shared Data Model (SDM) the group is using to conform to the latest changes released in an accepted standard. The user loads an SDM content file to create a model. | |||
[[File:Workflow-newModel.png|border|800px]] | |||
[[File:Worlflow - CreatedSubmodel.png|border|300px]] | |||
The user loads the model into an SDM_Editor project and begins to make the changes. | |||
[[File:Worlflow - CreatingProject.png|border|800px]] | |||
[[File:Workflow - SwitchProject.png|border|300px]] | |||
Once the user has made the changes necessary to match a decided-upon standard, the user publishes a version v1 of his SDM model. | |||
[[File:Workflow - PublishProject.png|border|300px]] [[File:Worklow - PublishedModel.png|border|300px]] | |||
Chris is going to make further changes in the SDM_Editor | Chris is going to make further changes in the SDM_Editor project, but that will be for the next standard update. In the meantime, the user wants to make the static version of the SDM they just published available to the rest of his team, so the user gives them Read permissions to it. However, making further changes to the SDM is his job and the user wants to stay in control of the process, so the user does not give any of his colleagues permissions to either the live version of the SDM model or the SDM_Editor project. | ||
[[File:Phenom-manage-example-chris-7.png|border|800px]] | |||
=== Part 2 – Dave === | |||
Dave is working on creating a Domain Specific Data Model (DSDM) for the team to use - he will be referencing the SDM Chris released in his efforts. He creates a new | Dave is working on creating a Domain Specific Data Model (DSDM) for the team to use - he will be referencing the SDM Chris released in his efforts. He creates a new project into which he adds the SDM version he has access to and a blank model which will contain the DSDM content he creates. | ||
[[File:Workflow - Davecreate project.png|border|800px]] | |||
After Dave has added some content to his DSDM model which references nodes in the SDM, he will see that his DSDM model is now listed as dependent on the SDM model he has been using – which means, it can no longer be loaded without it. | |||
[[File:Workflow - Dependencies.png|border|800px]] | |||
Nick and Riley will be documenting some interfaces against the domain model that Dave is working on. However, Dave does not want them to have to wait for him to have finished with all of his work before they can start. Also, as they work on their interface documentation, they may come up with good changes to the DSDM and suggest that they be included in Dave's work. So, Dave decided to share his project with Nick and Riley, giving them Read/Write permissions, which automatically gives them permissions to the active DSDM model version he's working on. | |||
[[File:Phenom-manage-example-dave-4.png|border|800px]] | |||
=== Part 3 – Nick & Riley === | |||
Nick and Riley will be documenting interfaces using the DSDM that was shared with them, but they will be working with different sets of interfaces, each in his own project. | |||
If they try to create a new project with just the DSDM, they will be rejected because they must also load in the SDM that was used to create it and on which it depends. | |||
[[File:Workflow - DepFailure.png|border|800px]] | |||
Once they have the appropriate permissions to all of the content, they can create their individual project with the models to house their documentation work separate from the contents of both the SDM and the DSDM. | |||
In the example below, Riley creates a RILEY_s_INTFC_DOC project including the DSDM_live model and a new blank model for his changes. By doing so, a new model, DSDM_IN_RILEY_S_INTFC_DOC, was created, inheriting from Dave’s DSDM_live. | |||
[[File:Manage workflow - Final2.png|border|800px]] | |||
Dave and Riley will now be able to independently edit DSDM content and merge changes between their two models as they see appropriate. | |||
Whenever Dave makes new updates to the DSDM, Nick and Riley have the opportunity to pull in those changes into their copies of the model. When either one of them makes a change to the DSDM portion of his project that he thinks should be included in the official version, they can make a push request to Dave's project that he can then either approve or ignore. | |||
Once they have the appropriate permissions to all of the content, they can create their individual | |||
In the example below, Riley creates a RILEY_s_INTFC_DOC | |||
Dave and Riley will now be able to independently edit DSDM content and merge changes between their two | |||
Whenever Dave makes new updates to the DSDM, Nick and Riley have the opportunity to pull in those changes into their copies of the | |||
Latest revision as of 14:39, 23 July 2024
Projects & Models 101
A project in PHENOM is composed of one or more models which are loaded together into a workspace. A model is a collection of nodes. A node can be an entity, an association, an observable, a view… One objective of a project is to be:
- Independent
- Complete: reflect the reality to the best of its ability
- Compliant
- Valid (or at least "validatable ")
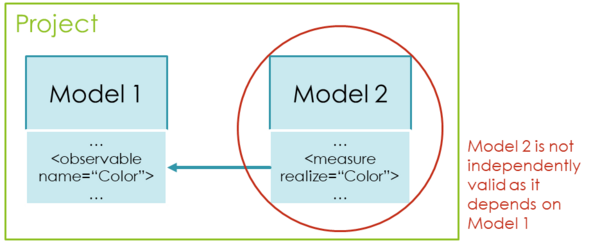
A model in and of itself might not constitute a complete, compliant, or even valid project as it might depend on entities inside other models, making it impossible to load independently. However, by combining several models in a project, they can form a complete, compliant, and valid model.
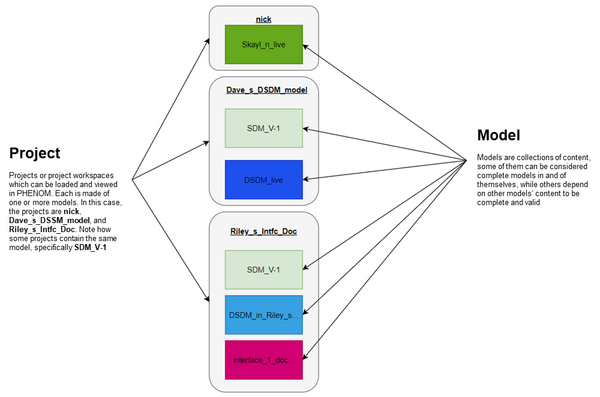
The following diagram depicts how a model can be part of multiple projects.
Once a project is loaded into PHENOM, the node contents of its constituent models can be added to as well as edited.
Projects Management
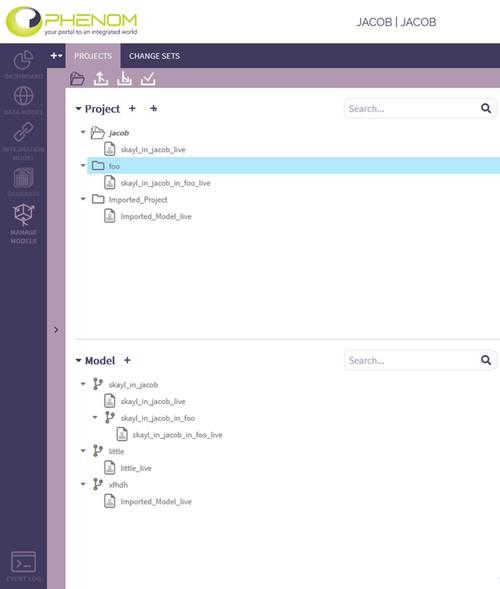
When in PHENOM > Manage Models > Projects, the user can see the projects and models they have access to.
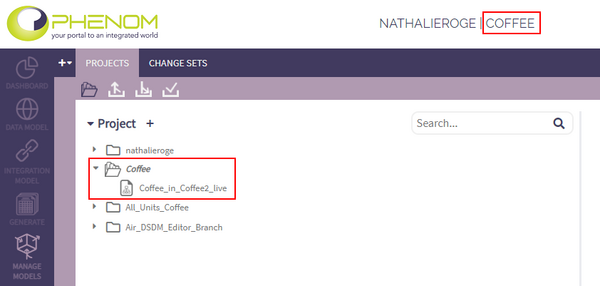
The project you are currently working on is displayed at the top of all the pages. Additionally, in the Manage Projects page, the active project is the expanded by default and has a different icon.
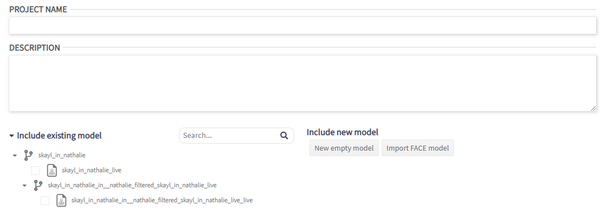
To create a project, the user can click on the + button in the Projects list and then select existing models, import new FACE models, or add new blank models.
There are three ways a user can have access to a project or a model:
- The user creates it
- The user uploads it
- The user is assigned permissions from an external user
The user will see, for each model, its inheritors and versions.
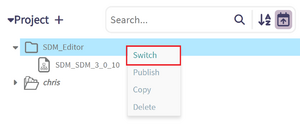
The user can easily switch between projects in the Projects Management page.
Model Versions
In PHENOM, models maintain the content as well as the record of changes made to that content.
By default, each model has a "live" version. This is the version of the model which, when loaded in a project can be edited and amended.
When the user is satisfied with the current state of a model, they can publish it, thus creating a “static” version of that model. A published version of a model is a snapshot of its content at one point in time. It cannot be added to or edited but can still be included in a project, referenced by and depended upon by the contents of a different model.
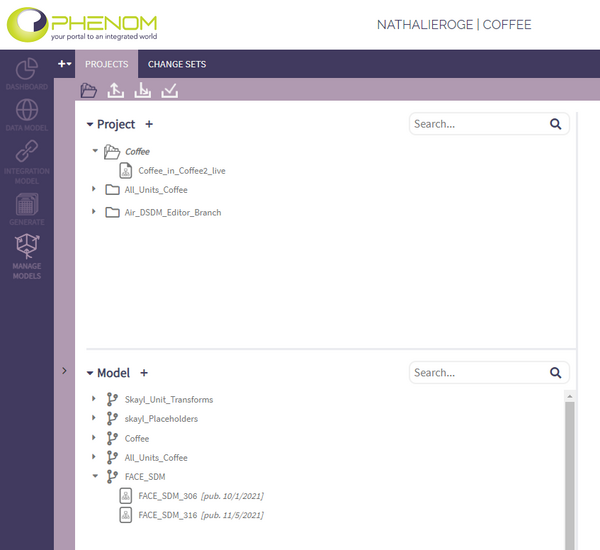
In the example below, the model version FACE_SDM_306 and FACE_SDM_316 are a "published" version of the FACE_SDM model. While it can be shared with other users, included in a project, and referred to and depended upon by other models, it can never be edited. In the Model tree, all published models have their publication dates displayed for ease of use.
Model Inheritance & Content Merging
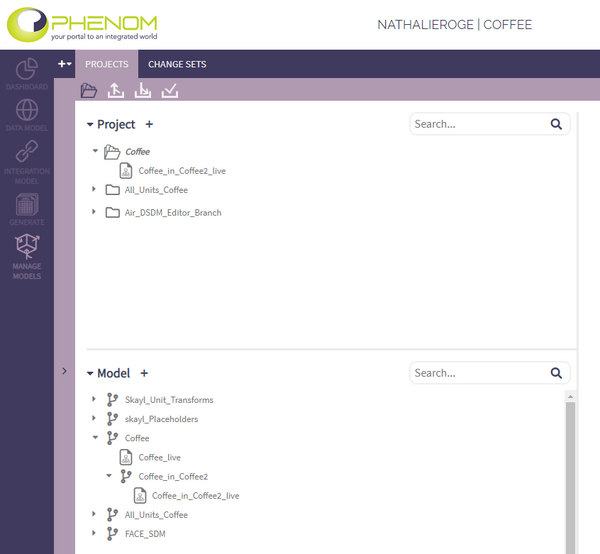
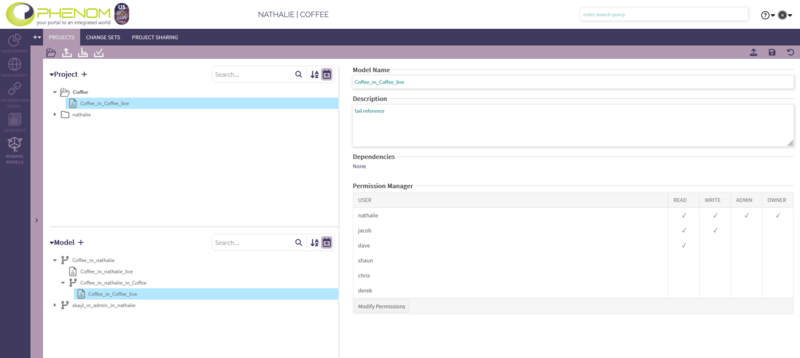
The same model can be loaded as a part of several different projects. However, the users of those projects will not be able to edit the content of the model simultaneously. When a user chooses to include in a project a model which is already a part of a different project, a "child" model will be created. This inheriting or "child" model is not a different version of a model, but rather its own model which inherits some portion of its content. At first, the inheriting and the parent models are identical but as their respective user make changes, they grow apart. Therefore, it’s possible for this "child" model to merge its changes to and from the parent model. A user can see the relationships between models in Manage Models > Projects > Model. In this example, the model Coffee is the parent of the model Coffee_in_Coffee_2. This results from the Coffee_live version of the Coffee model being loaded into a new project. When edits are made in either the parent or child model, the changes can be merged between them.
Clicking on a live or published model will display its characteristics on the right panel. The user will be able to edit some of the model's characteristics and the permissions of the model, provided the user has Admin or Owner privileges for that model.
Copy Project
Copying a project allows for easy cloning of project content with just a click of a button. The resulting project will contain a child of all the live models of the source project and the same published models.
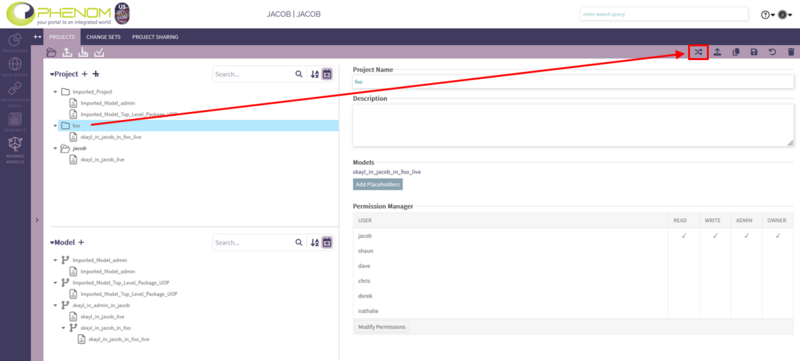
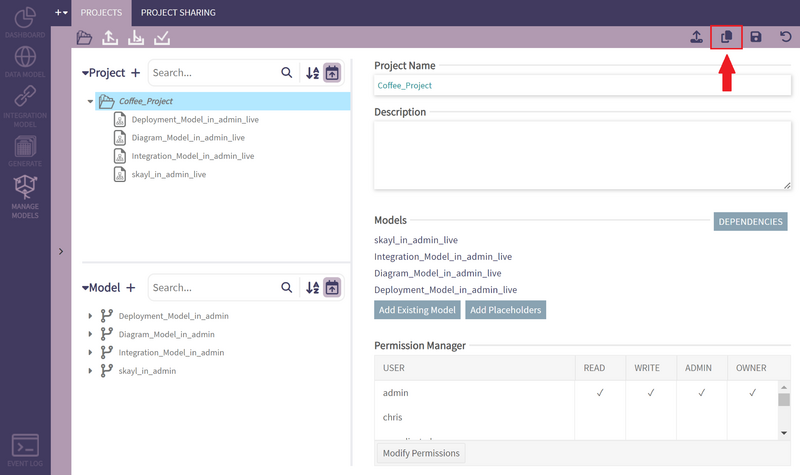
To copy a project, the user just needs to select a project from their project tree and click the copy project icon on the top-right.
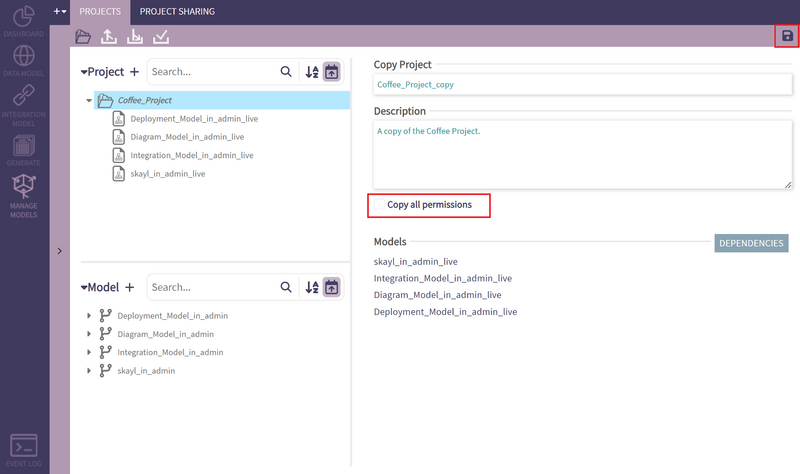
The copy project screen closely resembles the project creation screen, requiring the user to input a new name and description for the new project. Additionally, the user must choose whether to copy the existing permissions from the source project to the copied project before saving.
Sample Workflow
This section goes over a sample workflow which employs the PHENOM project and model structure concepts described in the sections above. In the scenario laid out below, a group of users, Chris, Dave, Nick, and Riley are working on different parts of completing a data model and documenting a set of interfaces against it. Each of them plays a slightly different role in the process, and they will use some of PHENOM's Model management features to keep their work organized.
Part 1 – Chris
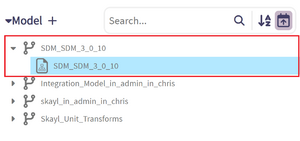
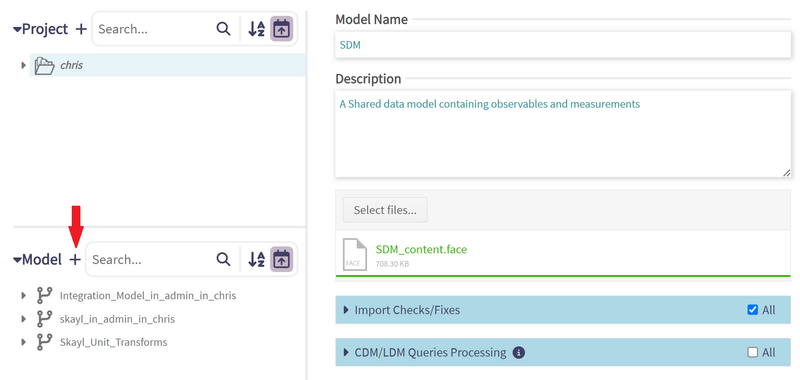
Chris is working on updating the Shared Data Model (SDM) the group is using to conform to the latest changes released in an accepted standard. The user loads an SDM content file to create a model.
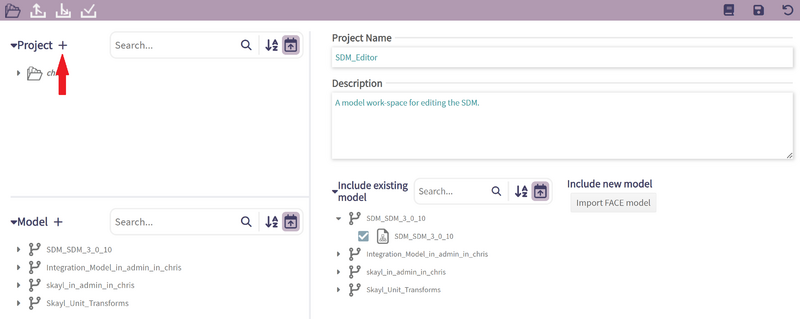
The user loads the model into an SDM_Editor project and begins to make the changes.
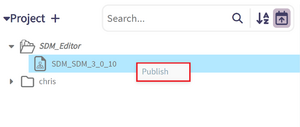
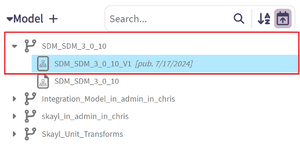
Once the user has made the changes necessary to match a decided-upon standard, the user publishes a version v1 of his SDM model.
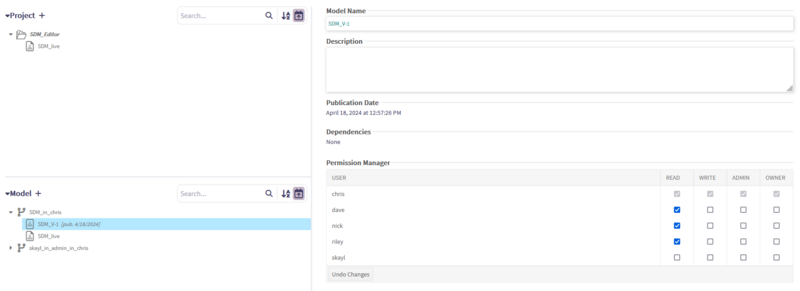
Chris is going to make further changes in the SDM_Editor project, but that will be for the next standard update. In the meantime, the user wants to make the static version of the SDM they just published available to the rest of his team, so the user gives them Read permissions to it. However, making further changes to the SDM is his job and the user wants to stay in control of the process, so the user does not give any of his colleagues permissions to either the live version of the SDM model or the SDM_Editor project.
Part 2 – Dave
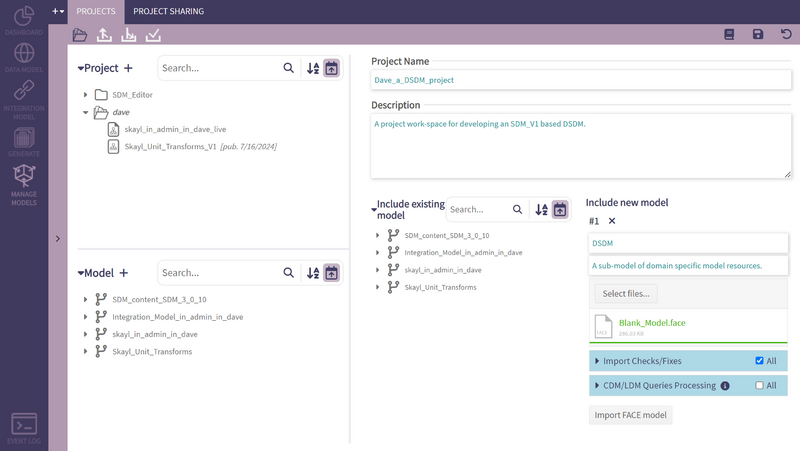
Dave is working on creating a Domain Specific Data Model (DSDM) for the team to use - he will be referencing the SDM Chris released in his efforts. He creates a new project into which he adds the SDM version he has access to and a blank model which will contain the DSDM content he creates.
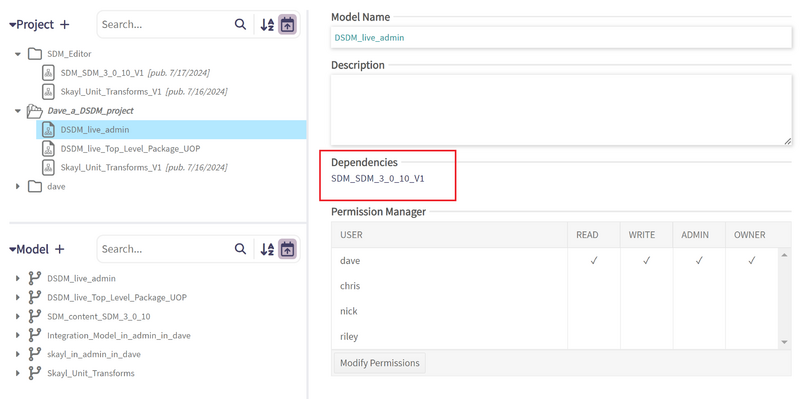
After Dave has added some content to his DSDM model which references nodes in the SDM, he will see that his DSDM model is now listed as dependent on the SDM model he has been using – which means, it can no longer be loaded without it.
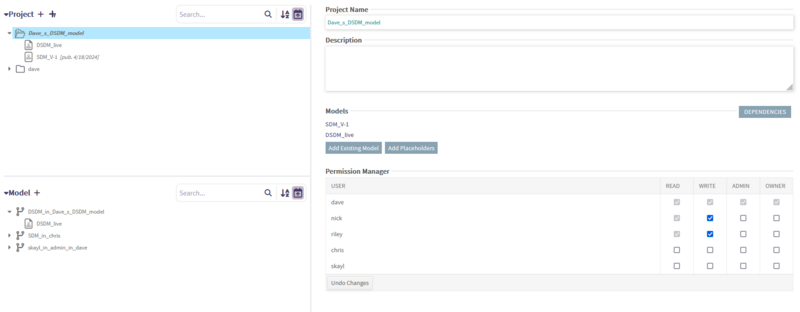
Nick and Riley will be documenting some interfaces against the domain model that Dave is working on. However, Dave does not want them to have to wait for him to have finished with all of his work before they can start. Also, as they work on their interface documentation, they may come up with good changes to the DSDM and suggest that they be included in Dave's work. So, Dave decided to share his project with Nick and Riley, giving them Read/Write permissions, which automatically gives them permissions to the active DSDM model version he's working on.
Part 3 – Nick & Riley
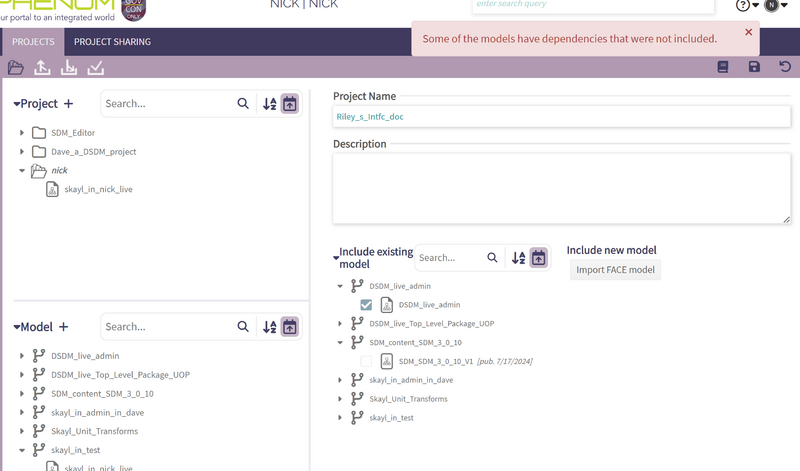
Nick and Riley will be documenting interfaces using the DSDM that was shared with them, but they will be working with different sets of interfaces, each in his own project. If they try to create a new project with just the DSDM, they will be rejected because they must also load in the SDM that was used to create it and on which it depends.
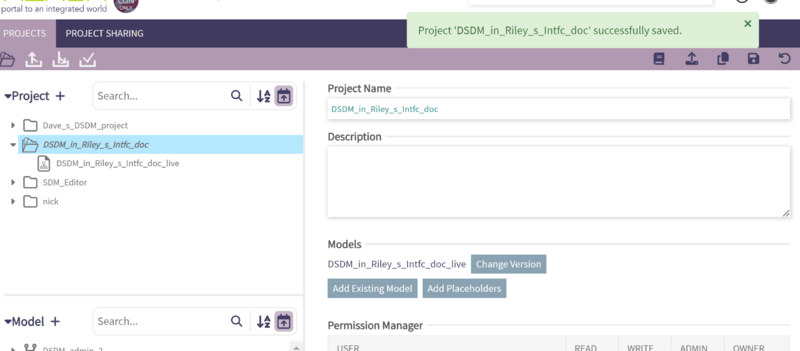
Once they have the appropriate permissions to all of the content, they can create their individual project with the models to house their documentation work separate from the contents of both the SDM and the DSDM. In the example below, Riley creates a RILEY_s_INTFC_DOC project including the DSDM_live model and a new blank model for his changes. By doing so, a new model, DSDM_IN_RILEY_S_INTFC_DOC, was created, inheriting from Dave’s DSDM_live.
Dave and Riley will now be able to independently edit DSDM content and merge changes between their two models as they see appropriate. Whenever Dave makes new updates to the DSDM, Nick and Riley have the opportunity to pull in those changes into their copies of the model. When either one of them makes a change to the DSDM portion of his project that he thinks should be included in the official version, they can make a push request to Dave's project that he can then either approve or ignore.
